 XI Wiki


While my previous how-to for streaming games with Flash Media Encoder and VHScrCap is still a viable method of streaming, the people behind VHScrCap have since released a new product named Xsplit Broadcaster that is an effective, affordable all-in-one streaming tool capable of streaming from both capture devices and direct screen capture, as well as mixing in things like microphone input, skype audio, re-streams, and the layering of several media files within one screen.
Xsplit is currently available as a free beta, it has some bugs here and there but is overall a great piece of software. A full two-year license is currently available for $40, which will begin from the day of the release version's debut. I personally have purchased the software and would recommend it to others. The only real drawback I can find at the moment is that the learning curve and amount of settings that need to be played with is fairly higher than using my previously detailed method, and if it does not work with password-protected justin/twitch.tv accounts(this is probably no matter, jtv passwords are fucking useless.
While more comprehensive info can always be found on the Xsplit Community Forums, I will try to make this a short, concise guide on how to get started.
To begin, you'll obviously need a Justin.tv account, please see the previous thread on how to set that up. You will then need to register at the Official Xsplit Site to download the beta version.
Setting Up Xsplit
Compared to the FME/VhScrCap method, Xsplit has an absolute plethora of settings to go through. You probably want to begin by choosing what resolution and frame rate you want to stream at underneath the 'View' tab. The quality of stream you can output will obviously vary by your internet connection and PC specs. I would not recommend trying to stream in 1080p, it does not gain much over 720p, is extremely resource intensive, and many viewers will have trouble watching it smoothly anyways. If you feel confident in your resources start with 720p/60fps, and adjust down from there if your feed is choppy. Per Xsplit's FAQ, if the streaming(and other open applications) are pushing your CPU load over 70% you're likely to experience stream lag.
Next, you will want to add your applicable channels. While Xsplit supports more than just Justin.tv, I personally am not familiar with any of the other streaming sites so I will not be covering them. To add your channel, go to 'Broadcast' > 'Edit Channels' and hit 'Add' > 'Justin/TwitchTV'. From here you will enter your justin.tv account information, all you need to add the channel is your account name and password, it will automatically detect your channel.
There are various settings here that you are going to want to tweak:
- Location - This is which Xsplit server you will be trying to connect to. You want to choose the closest geographical location to you. For example, myself living near Chicago should choose one of the 'US Central' server. Failure to adjust this setting is one of the top reasons for frames being dropped/laggy streams.
- Preset - This will determine the type of coding process used. The 'faster' settings will use simpler processing algorithms which will be easier on your processor, if you have a very strong machine you can set this to a slower setting, which will be more CPU-intensive but yield higher quality. I personally use the 'veryfast' setting and have no qualms with my stream quality.
- Quality - Another setting to determine the clarity of your feed. I personally use 8, higher than that can result in a laggier stream and in my opinion does not add enough extra quality to be worth it.
- VBV Max Bitrate/Buffer - This is the bitrate you wish to stream at. I honestly don't know enough about the intertubes to give guidelines on what bitrates are best for what quality settings, for 720p60 I would recommend something around 1800-2000. The Buffer should be set to somewhere between 1 and 2 times the Max Bitrate. You can use the 'test bandwidth' function down at the bottom to see how well your current settings communicate with the Xsplit server, if you do not consistently get yellow/green results you should try changing your settings.
- Resolution - This is the resolution that you will actually stream at(the 'View' > 'Resolution' setting is what you are capturing, you are not necessarily forced to stream at that same resolution). 'Default Stage Resolution' will be what you have set there. If you happen to have a channel from jtv supporting multiple stream quality options(this is unlikely, it's still in beta and typically reserved for major names in the game streaming communities) you can set something other than 'Default Stage Resolution' and it will stream in both the Default and the chosen resolution. If you do not, changing this preset to a lower resolution will result in it only streaming in that lower resolution.
- Audio - Audio settings are pretty straightfoward, 44,100 KHz 16bit stereo is pretty standard, I myself use a relatively low bitrate of 64000.
- Automatically Record Broadcast - Xsplit is capable of recording your stream locally as it streams. If you wish to edit your stream videos to upload to youtube and such you can check this box. It currently only records to FLV format.
Save your settings when finished. It is likely to take lots of tinkering with these settings to find what works for you.
Adding Sources To Scenes
Xsplit is capable of not only streaming several forms of content at the same time, but also of creating multiple 'scenes' each of which can have its own set of content. To simply add a direct stream of your gameplay, click on 'Add' down in the 'Screen Sources' box. From here you can choose from several options:
- Add Camera - This will not only allow you to add your connected web camera input, but this is also where you will choose your capture device if you are streaming directly from a console into one.
- Add Media File - Allows you to add all sorts of different file types, from still images to animated .gifs to video files.
- Add Screen Region - This is what you will use to stream directly from your desktop. After hitting this option, simply drag the confines of the region over the area you wish to capture. When first choosing the region, it is likely that it will not show as taking up the full capture window on the Xsplit previewer. Simply grab the corner and drag it down until it resizes to the full window.
- Add Livestream - This will allow you to add another stream into yours for restreams.
- Others - I don't know what the hell an IP camera is, you can figure it out. 'Add swf file' will allow you to add various Flash files to the stream, such as Starboard, which is a built in Starcraft II(I think) score overlay.
After selecting what you want to have in a particular scene, you can then choose another scene and add other things to it. This is handy for things such as having a scene with a score overlay, and one without, so that you can change to the scene without it while you udpate the score and change back. In 'Tools' > 'General Settings' > 'Hotkeys' you can assign hotkeys to each individual scene to easily change between them, or you can just click on the scene you want down in the bottom-right corner.
Other Settings
Other things you may want to change are underneath the 'Tools' > 'General Settings' option.
- Let Xsplit disable Aero Theme - This should be on by default, it's pretty straightforward, the Windows 7 Aero theme will do goofy things to direct screen capture, it is best to leave this enabled.
- Enable Game Source - For those who have purchased the full version of Xsplit, there will be available the option of using 'Game Source' which has the ability to capture a game that is being played in unwindowed fullscreen mode(!). This is still in beta and is not 100% compatible with all games/video cards.
- Others - I don't know what the rest of the crap does, I don't use any of it. 'Microphone' is self-explanatory, it will allow input from your desk mic to be fed directly into your stream. 'Location' allows you to choose where the local recordings will be saved if you enable that function.
Broadcast!
That's about it for basic settings. All that's left to do now is hit 'Broadcast' and choose on which channel you wish to begin streaming to, just click on it to begin streaming. To cease streaming, click on it again.
I think the 'Announce' function simply sends out an announcement to anyone subscribed to your channel, I haven't used it myself.
That's pretty much it! If you have basic questions I can probably answer them in this thread, anything about advanced settings is probably best deferred to the official Xsplit forums.
- Navigation
+ Reply to Thread
Results 1 to 3 of 3
-
2012-01-22 16:07 #1
SASSAGE KING OF DA WORLD
cheap hawks gay
- Join Date
- Sep 2007
- Posts
- 26,424
- BG Level
- 10

How To Stream Games w/ Xsplit and Justin.tv
-
2012-01-22 18:39 #2Old Merits
- Join Date
- Sep 2006
- Posts
- 1,010
- BG Level
- 6
A note about webcams. If your webcam isn't showing up in xsplit it might be in use by another application. Just close down the other program to see if that fixes the problem.
-
2012-03-10 18:18 #3
SASSAGE KING OF DA WORLD
cheap hawks gay
- Join Date
- Sep 2007
- Posts
- 26,424
- BG Level
- 10
Figured I'd go ahead and add a little how-to for using Jaxer's PanelWriter app for adding player/event/score info to your stream on the fly.
To start, download the app(it's free!) here. As a brief synopsis of what PanelWriter actually does, basically it edits text to a .png image on the fly. Compared to using something like TitleSource and an XML file it is much easier/faster to edit things, however you cannot get Xsplit to poll images on a timer the way you can with TitleSource and XMLs. Both require about the same amount of overall setup time, pending your skills with photoshop. If you are absolutely awful with image editing software you might be better off just using TitleSource, I will try to post a short tutorial on that as well at some point.
As far as the contents of the application, your download will contain the .exe, and two folders, a 'data' one and an 'images' one. The images folder is the one you'll work with for the most part. There will be four images stocked in the folder at first:
- event.png: This image will be affected by the 'Event Titles' tab of the application.
- match.png: This image will be affected by the Round/Players/Game parts of the 'Match Titles' tab.
- score.png: This image will be affected by the Score counters of the 'Match Titles' tab.
- lower.png: This image will be affected by the 'Lower Thirds' tab.
Short version is, you put what you want into the GUI, hit save, and the application will edit text onto the .png file instantly. While you could just have a transparent image and then lay the text raw over your stream, many people prefer to have an actual overlay graphic. The ones that come stock with the application are just shitty placeholders, you'll definitely want to replace them with a transparent placeholder at the least.
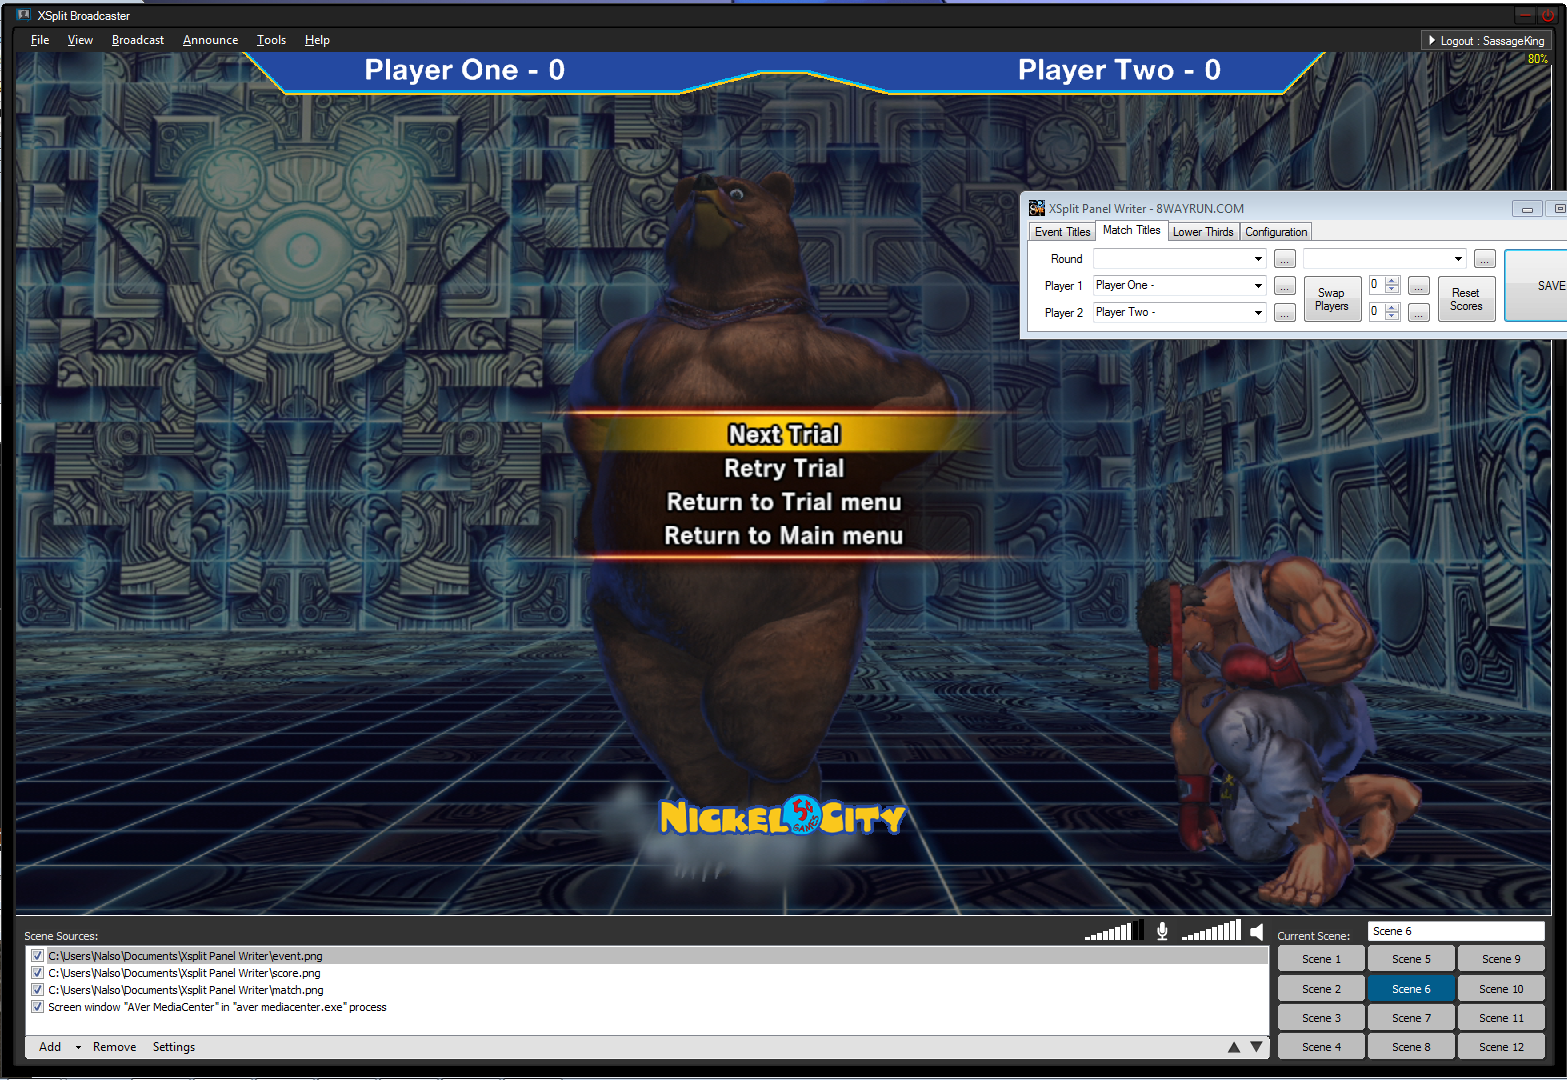
So to start, here's what it looks like when you fire up the GUI:
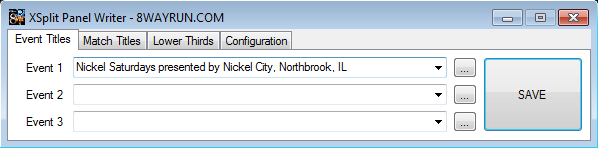
You can set 3 separate text lines, which upon hitting 'save' will be written on top of whatever image is saved as 'event.png' in your Panel
Writer 'xsplite-images' folder. By clicking on the '...' you can access the parameters of that individual line:

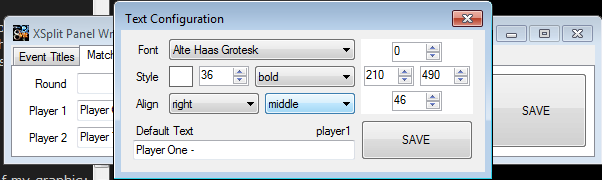
The stuff on the left is pretty straight-forward, the 'Style' is for the font color. The 'Align' options are horizontal > vertical. The four spin boxes are, from the left counter-clockwise: Horizontal pixel position of top-left of the text box; Vertical pixel position of the top-left of the text box; Horizontal width of the text box; and Vertical Height of the text box. By changing the 'default text' and hitting save, you can not only edit the text, but it will also add the new text as a drop-down option on the Event Titles tab.
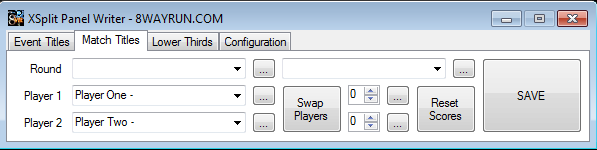
Under 'Match Titles', you can set text for the Round, Player names, game title(the blank one on the right, I don't use it myself, most people can tell what game you're playing). All of this adds text overlay to the image saved as 'match.png' The counters underneath it edit the 'score.png' file. The '...' buttons work in the exact same manner as on the other tabs. Basically you set each individual piece of information to be where you want it, in the font, size, and style that you want it in.
Now enters the shooping. I personally use a mix of Photofiltre(free) and Photoshop Elements 10(not free). I like using Photofiltre just because it's stripped down, easy, and I'm used to it, but certain things like making transparencies are much easier on PSE.
If you're planning on just overlaying text directly on your stream without any sort of graphic, you can just make a quick transparent .png image in the size of you capture window, for example I can just go to 'New File' > 'Blank File' and set 'Transparency as the background color in PSE. Alternatively in PF, I can just make the background all one solid color and then hit the transparency button which will choose a color and make every pixel of that same color transparent. I'm not exactly a pro at PF, but it seems that regardless of what you do, it chooses whatever color is at the 0,0 pixel position in the image to turn transparent.
Spoiler: show
You should end up with something like this:
Spoiler: show
Save this image in the 'data-images' folder of Panel Writer as whatever you want to have text overlaid upon. I use full transparencies for my 'score.png' and 'event.png' files.
For 'match.png', I created an actual overlay. It's basically a 1920x1080(or whatever is the screen capture resolution you have Xsplit set to) transparency with a graphic to put names/scores on top of and a logo at the bottom(BG Logo credit goes to millionsknives).
Spoiler: show
I then go into Panel Writer, adjust text fields as necessary to fit on top of my graphic:
Then within Xsplit, go to 'add media file' and select your images. I usually add my screen capture window first, then 'match.png', then 'score.png' and 'event.png':
Spoiler: show
Note that 'match.png' is the actual graphic with the round/player info written on top of it, then 'score.png' is a transparency where only the two numbers for the score are written on top of the transparent background, but I can position the numbers to sit on top of everything offset enough to be next to the player names.
From there, updating things on the fly is simple. Every time you make a change, just click the big 'SAVE' button, and you're set. However, do note that Xsplit will not automatically poll for changes in image files, and if you switch between two scenes that feature the exact same image, it will also not poll for changes then. To get around this, have a second scene with just the logo and not the player name bar on it. Switch to that scene, then switch back to your main scene, and boom, the text on top of the overlay is updated.
I know I'm relatively awful at explaining this shit, so if anyone has specific questions feel free to post them in this thread.


 Reply With Quote


Similar Threads
-
How To Stream Games w/ FME and Justin.tv
By Callisto in forum Game StreamingReplies: 1Last Post: 2012-07-23, 07:46