 XI Wiki


Introduction
Format
This guide is written with the idea that you will progress gradually. Since you will not progression to phase five in one swoop, it makes no sense to worry about it until then. Therefore, videos have been segmented to show only the phase you are working on. Each phase will have the following components:
- Timeline (:: means begins CASTING the action)
- Segmented Video
- Glossary (Underlined actions are clickable and show a video/image of the action)
- Images
- Summary and explanation
- Individual section for certain mechanics
Preparations
- Enrage: 13min 30s
- Accuracy Caps: ~605 | ??? | ~703
- Player HP: ~18k preferable
- Food/Potions (Obvious)
Assignments
A number of mechanics require predetermined action from players. In addition to assigning mechanics, a few diagrams reference tank1/tank2/healer1/healer2/melee1/melee2/ranged1/ranged2. It helps if you assign that ahead of time. This is something you can do as you get to mechanics if you are progressing, but it is useful for when PUGs/Traps emerge.
- Enumeration (Add phase): [T1/H1/M1/M2] + [T2/H2/R1/R2]
- Enumeration (Intermission Two): [T1/T2/M1/M2] + [H1/H2/R1/R2]
- Enumeration (Link-Up): [T1/T2/H1/H2]
- Double Drill bait: OT
- Super Jump bait: BLM/OT/BRD/MCH
Enemy HP Values
- Onslaughter: 1,007,200 HP
- Steam Regulator: 25,280 HP
- Blaster: 430,240 HP
- Brawler: 344,160 HP
- Swindler: 344,160 HP
- Vortexer: 430,240 HP
- Brute Justice: 1,281,760 HP
- Winged Brute Justice: 1,820,099 HP
Full PoV Videos
Spoiler: show
Tips from players
WHM: https://docs.google.com/document/d/1...Er5Skgf3w/edit
SCH: http://pastebin.com/UKy15KPG
- Navigation
+ Reply to Thread
Results 1 to 20 of 30
-
2016-03-29 15:11 #1An exploitable mess of a card game
- Join Date
- Sep 2008
- Posts
- 13,258
- BG Level
- 9
- FFXIV Character
- Gouka Mekkyaku
- FFXIV Server
- Gilgamesh
- FFXI Server
- Diabolos


Alexander Midas IV (Savage) [AS8] Guide
-
2016-03-29 16:19 #2An exploitable mess of a card game
- Join Date
- Sep 2008
- Posts
- 13,258
- BG Level
- 9
- FFXIV Character
- Gouka Mekkyaku
- FFXIV Server
- Gilgamesh
- FFXI Server
- Diabolos
Phase 1: Onslaughter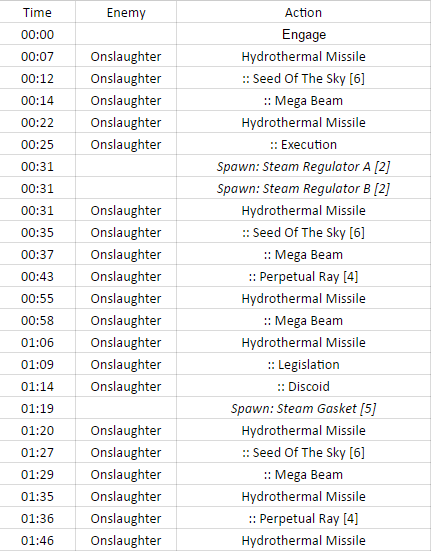
The encounter is fairly straightforward until Execution. Bait Seed of the Sky to Onslaughter's right flank to keep the area clean. Execution spawns four white and black squares with Steam Regulators (pentacles) inside them. There are a few points to note about this mechanic:- You only have 20s to defeat them
- Only the first person to enter the square may attack them
- If you leave the square, it detonates and wipes the raid
Seed of the Sky, Mega Beam, and Perpetual Ray will occur while fighting the Steam Regulator. Since the first hit of Perpetual Ray grants a Vulnerability stack, you need to either Holmgang the subsequent stacks or provoke during the cast bar. The first hit will always hit the initial target of Perpetual Ray, so you can provoke early and begin to build a threat lead before the cast finishes.
Legislation randomly assigns one to four stacks of Final Punishment . Forty seconds after Legislation, Onslaughter checks if any players have Final Punishment debuffs remaining. If they do, he uses Final Sentence to wipe the raid. If players with stacks of Final Punishment fall before removing their stacks, it is an instant wipe as well. To remove stacks, you must receive damage. Hence, a person with four stacks must receive damage four times. Conveniently, Onslaughter uses Discoid shortly after Legislation; thus, summoning five Steam Gaskets (Orbs). Four of those Steam Gaskets are tethered to players inflicted with Final Punishment debuffs. One of them is tethered to a random healer. As in normal mode, players will instantly KO if they receive damage from their tethered Steam Gasket. Furthermore, the damage from Explosion increases with the number of players damagedExecution
Execution
Spoiler: show
Legislation
Spoiler: show
-
2016-03-29 16:20 #3An exploitable mess of a card game
- Join Date
- Sep 2008
- Posts
- 13,258
- BG Level
- 9
- FFXIV Character
- Gouka Mekkyaku
- FFXIV Server
- Gilgamesh
- FFXI Server
- Diabolos
Phase 2: Adds
Refer to this image for the spawn location of every add and positioning for Blaster. The first two to spawn will be Brawler and Blaster. I am going to talk about the properties of all robots, each robot, and how to handle this phase.
All robots:
- Tank busters no longer give Magic Vulnerability Up
- Have an ability they use once at 50% HP
Blaster
- Has a 48s enrage (When Vortexer spawns)
- Nothing but tank busters until 50%
- Physical auto-attacks and tank buster
- Mind Blast at 50%
- Blaster Mirage spawns around 55%
- Blaster Mirage acts like a normal add unlike Mirages in AS6
- Blaster Mirage makes Blaster immune if too close
- Blaster Mirage despawns after defeating Blaster
Brawler
- Stays stationary in the center
- Magic auto-attacks and tank buster
- Auxiliary Power: Increases Brawler’s attack and defense if any robots are within the green circle
- Only gains access to Rocket Drill (Single Drill) under 50%
- Invulnerable (But targetable) and spawns orbs at 50% HP
Swindler
- Spawns 24s after Blaster and Brawler spawn
- Magic auto-attacks and tank buster
- Uses Bio-arithmetick at 50%
Auxiliary Power (HP - Uses Self-destruct once Vortexer is defeated
Vortexer
- Spawns 24s after Swindler spawns
- Physical auto-attacks and tank buster
- Super Cyclone at 50% HP
- Elemental Jammer only grants access to Earth Missile and Compressed Lightning

- Uses Self-destruct once Swindler is defeated
For this guide, we decided to use the following order: Blaster → Brawler → Swindler + Vortexer
When you begin this phase, T2 should pick up Brawler by using a full threat combo in tank stance. Afterwards, he may return to Blaster to help DPS. Typically, you will receive one attachment mechanic before Swindler spawns. If it is a tank buster, T2 needs to avoid hitting the raid. That is why he is positioned to the left in the image and the raid to the right. At 50% silence Mind Blast and T2 should provoke Blaster. T1 should move to Swindler with the Blast Mirage while avoiding Brawler’s Auxiliary Power. Position enemies between squares to make height easier. Since you have four active enemies, expect higher healing.
After Blaster is down, focus Brawler until 50%. He will become immune and spawn two large orbs and two green orbs. These orbs function the same as their AS6 counterpart. Apply damage reduction and INT debuffs as necessary (Since you can still attack Brawler). One heavy and one stun will force orbs to land alongside one of Brawler’s attachments. Add or remove one of those to manipulate the orbs as you please. For the duration of this orb phase, DPS should aim to push Vortexer and Swindler to roughly 55%. Do not push either of them to 50%. After the orb phase, if T2 has enough aggro, he can provoke Swindler as the DPS burn Brawler (Do not bring Swindler to Brawler of course). Otherwise, defeat Brawler before provoking.
By now, T2 should have Swindler and T1 should have Vortexer. Move Vortexer in accordance with this image. Take Swindler to 10% before proceeding to push and defeat Vortexer. Try to wait for height before doing so though. If you have enough DPS, you can actually skip Punishing Thunder.
-
2016-03-29 19:23 #4An exploitable mess of a card game
- Join Date
- Sep 2008
- Posts
- 13,258
- BG Level
- 9
- FFXIV Character
- Gouka Mekkyaku
- FFXIV Server
- Gilgamesh
- FFXI Server
- Diabolos
Phase 3: Brute Justice
Double Rocket Punch and Flarethrower
Begin this phase shielded and stacked at the end of the arena to minimize knockback. The entirety of this phase is about learning the dance and strong mitigation. The Flarethrower and Double Rocket Punch are fairly straightforward. The OT only needs to briefly run in and cooldown Double Rocket Punch with the MT. If the MT pops a 20s cooldown before the first Flarethrower, it will last through Double Rocket Punch, the next Flarethrower, and a short needle.
Long Needle and Short Needle
The primary dance of this phase is the combination of Long Needle, Short Needle, Mega Beam, Super Jump, and Apocalyptic Ray. Long Needle is a mechanic with three constituents:
- Stack Marker
- Prey Markers [2]
- Ground Markers
Two Prey debuffs will appear as Brute Justice launches missiles into the air. Each of these Prey marked targets will take heavy damage in a small AoE around them. The Stack marked player will take severe damage that can be split among players. There will also be two sets of ground markers that players need to avoid. Before the damage from the Prey and Stack markers resolve, Brute Justice will use Short Needle and Flarethrower.
Mega Beam, Super Jump, and Apocalyptic Ray
As the damage from these markers resolves, Brute Justice will prepare Mega Beam. It is important to note that Short Needle animation will obfuscate your ability to see the direction of Mega Beam. During the Mega Beam cast, he will target the farthest player in anticipation of his next move: Super Jump. As he lands for Super Jump, he will select a random player for Apocalyptic Ray.
Intermissions and Brute Justice
You may have noticed that the next two sections are labeled “Intermission” rather than phases. They are technically part of this Brute Justice phase, but because they are extensively mechanics heavy, I decided to discuss them separately. This phase, in its entirety, looks like this:
Brute Justice → Intermission One → Brute justice → Intermission Two
Note that Long Needle’s damage increases after the first intermission. Furthermore, he gains a Damage Up stack if any player is KOed during intermission. If Brute Justice’s HP reaches 1%, he will skip the rest of his attack sequence and immediately begin the next intermission. For most groups, that means he will begins intermission two. So let us review what type of difficulties this phase presents:
- How can we keep players stacked while avoiding ground attacks, Flarethrower, and prey marked players?
- How can we heal through consecutive damage from Short Needle and Long Needle after the first intermission increases Long Needle damage?
- How do we avoid Mega Beam despite obfuscated vision from Short Needle?
- How should we manipulate Super Jump since we know it precedes Apocalyptic Ray?
Long Needle and Mega Beam
Spoiler: show
Super Jump and Apocalyptic Ray
Spoiler: show
-
2016-03-29 22:01 #5An exploitable mess of a card game
- Join Date
- Sep 2008
- Posts
- 13,258
- BG Level
- 9
- FFXIV Character
- Gouka Mekkyaku
- FFXIV Server
- Gilgamesh
- FFXI Server
- Diabolos
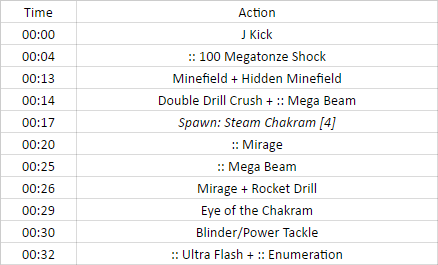
Intermission One: After first Brute Justice rotationBrute Justice will leap into the air to perform J Kick. Following that, he will deconstruct into his constituent robots to perform a series of mechanics. The timeline and video show what mechanics you will encounter, so we will first discuss intended traps (cards) and how to handle them.

・ Glossary and Diagrams ・
Glossary
Mirage Baiting
Ice and Earth Missile Baiting
・ Summary and Strategies ・
The first trap is 100 Megatonze Shock, Mirage, Supercharge, and Double Buster. You want to be far from the center but not stacked. You also want Supercharges positioned so they do not hit the raid for Double Buster. Using this formation, you maximize distance from the center, spread Mirages apart, bait Supercharge in a predictable manner, and have the rest of the arena safe for Double Buster. While soaking Double Buster, identify safe spots for Chakrams and avoid Mega Beam. Chakrams act like divebombs in a straight line from where they spawn. There are several rules to note about Chakrams:
- A total of four chakrams spawn
- Two chakrams spawn along the wall of the arena
- The other two chakrams spawn along the adjacent wall
The next trap is the combination of Height, Ice+Earth Missiles, Mega Beam, and Single Buster. Height will gravitate people towards the edge of squares and Missiles will scatter players. Here is the catch though: If your missile puddles are poorly placed, you can trap people for the ensuing Mega Beam. If your puddles are poorly placed, your tank may be forced to direct Single Buster into the raid. To prevent these problems, use : this positioning. It is not depicted in the video, so feel free to ask if you have questions about it. You want to bait the puddles to the edge of the arena and run up the edge of the square to do height properly.
-
2016-03-29 23:05 #6An exploitable mess of a card game
- Join Date
- Sep 2008
- Posts
- 13,258
- BG Level
- 9
- FFXIV Character
- Gouka Mekkyaku
- FFXIV Server
- Gilgamesh
- FFXI Server
- Diabolos
Intermission Two: After second Brute Justice rotation or HP pushed to zeroDrill Dive (Double Drill) and Minefield
・ Glossary and Diagrams ・
Glossary
All spawn locations
・ Summary and Strategies ・
Use this image of all possible spawn positions to aid your understanding of this section. The mechanics are fairly straightforward until Mirage. Bait the double drill and pick up mines. Taking Double Drill in addition to two mines is substantial damage even for a tank. You can heal through it or you can split the damage by having the OT pick up one of the mines. Pick whichever works for you.
Mirage, Mega Beam, and Rocket Drill
Mirage, Mega Beam, Rocket Drill, and Chakrams is a challenging combination of mechanics. The first problem is the most fundamental: damage. Mirage (~12k), Rocket Drill (~9k), and Blinder/Power Tackle (~4.5k) is about ~25.5k damage. For this reason, groups usually deploy an Adloquium off the warrior with as any healing buffs as possible (ex: Fey Illumination, Defiance, Convalescence, Dissipation, etc). DPS with physical damage mitigation (Manawall/Shade Shift/Keen Flurry) should use it here. After Mirage and Rocket Drill, there is usually enough time to use Indom/Assize/Medica before the subsequent Blinder/Power Tackle.
The second problem is spatial-temporal limitations. Where you position for Mirages will also affect Mega Beam targeting and Rocket Drill proximity. You need space from other players, proximity from Brawler, proximity from mines, and to point Mega Beam in a direction that does not box yourself or obstruct movement for others. Afterwards, position away from chakrams while performing the Blinder/Blaster mechanic. To simplify the mental thought of this phase:
- Assign general areas to PT members (Tanks should be closest to Brawler)
- Already know safe spots in relation to Brawler and your assigned area
- Leave yourself enough space to avoid Mega Beam without clipping a mine
- Do not worry about chakrams until Mirage spawns
- When chakrams spawn, position away from those before handling the Blinder/Power Tackle mechanic
- Know that each chakram only occupies half a square
- TANK LB3 IS VIABLE FOR CHEESING THE CHAKRAM PORTION OF THIS PHASE
Ultra Flash and Enumeration
You have one more hurdle after all of this: Enumeration and Ultra Flash. Enumeration targets one healer and one tank. We recommend a combination of H1+H2+R1+R2 and T1+T2+M1+M2 for this enumeration. You will notice there is no frozen ice to hide behind for Ultra Flash as there is for AS6. That is because you need to use the legs of Onslaughter to Line-of-sight (LoS) him.
-
2016-03-30 02:09 #7An exploitable mess of a card game
- Join Date
- Sep 2008
- Posts
- 13,258
- BG Level
- 9
- FFXIV Character
- Gouka Mekkyaku
- FFXIV Server
- Gilgamesh
- FFXI Server
- Diabolos
Phase 4: Link-UpGavel and Final Punishment

・ Glossary and Diagrams ・
Glossary
Gavel
"Final" Sequence
Long Needle v2
・ Summary and Strategies ・
Brute Justice will use Justice to restore full HP. Take this opportunity to pile on DoTs/debuffs and begin Melee LB so that it charges as he casts, but lands after he restores HP. Shortly afterwards, he will use Verdict to inflict eight debuffs on party members. Each debuff targets a specific role and must be “fulfilled” in 30s (When Gavel finishes casting). Additionally, he will inflict stacks of Final Punishment. Each type of debuff is correlated with a number of Final Punishment stacks (FP#).
 Final Judgement: Penalty I (Healer, FP3x): Exactly one debuff on your character when Gavel casts
 Final Judgement: Penalty II (Healer, FP1x): Exactly two debuffs on your character when Gavel casts
 Final Judgement: Penalty III (DPS, FP2x): Exactly three debuffs on your character when Gavel casts
 Final Judgement: Decree Nisi A (DPS, FP1x): Must engage and defeat Blue Steam Regulator
 Final Judgement: Decree Nisi B (DPS, FP1x): Must engage and defeat Orange Steam Regulator
 Final Judgement: Min HP (Tank, FP4x): Must have the lowest HP in the party
 Final Judgement: Max HP (Tank, FP4x): Must have the highest HP in the party
In addition to debuffs, four J Storms (Tornados), four Steam Gaskets (Discoids), and two Steam Regulators (Pentacles) will appear. J Storms reduce your HP to critical status and inflict Final Flight . This debuff prevents the same person from taking J Storms twice. Steam Gaskets do not move or tether as in phase one. The Steam Regulators function the same as phase one. Brute Justice will cast Gavel after 30s to determine if the party has met each condition. Shortly afterwards, he will determine if Final Punishment conditions have been met.
”Final” sequence
Brute Justice will leap into the air to perform J Kick and cast Link-up to gain the combined powers of constituent robots. The set of attacks labeled “Final” are fairly straightforward, but you have two options for handling them. One option is to have the MT soak all three attacks: Final Punch, Final Apocalypse, and Final Beam. This requires heavy mitigation from both the MT and from PT members (Shields + Virus + Adloquium + Apocatastasis). Alternatively, the strategy we use avoids the Final Apocalypse and soaks the Final Beam in the raid. If you use this strategy, the new MT must run through Brute Justice during Long Needle to avoid Flarethrowering the raid.
Long Needle and Hidden Mine
Unlike Long Needle from phase three, there will only be one set of ground attacks. There will, however, be a hidden mine that spawns near the center of the arena. Use this image to aid your understanding of how to handle this Long Needle. The mine will spawn to Brute Justice’s left or right, so the raid needs to move in the opposite direction. Unlike the previous Long Needle strategy, preys can comfortably move South.
Option 1: Compressed water with sac
After the Long Needle and Hidden Mines combination, send the player with compressed water to soak the damage from hidden mine. Position Brute Justice in a safe position from chakrams. Send the Enumeration target inside Brute Justice’s hitbox and the required number of players. Who you send does not matter, but make sure to discuss it prior. We prefer to use healers and tanks since they resist magic and only tanks receive enumeration. Dodge Mega Beam and bait Super Jump. You have one more “Final” sequence that incorporates Short Needle damage. The Final Punch tank should either prepare invulnerable cooldowns or stack powerful cooldowns. Quickly top and shield players after Final Beam.
Option 2: Compressed water without sac
The video above is the sac method. If you would like a video without the sac method, please refer to this video. After the Long Needle and Hidden Mines combination, send the OT to soak the damage from hidden mine. Position Brute Justice in a safe position from chakrams. Send the Enumeration and Compressed Water target inside Brute Justice’s hitbox. Use tanks and healers to fulfill the required members for enumeration. All other members need to be on the outskirts of Enumeration to soak Compressed Water damage. Dodge Mega Beam and bait Super Jump such that the MT can stand between Brute Justice and the Watersprout without tethering. Unlike AS6, Flarethrower is used to remove the watersprout. You have one more “Final” sequence that incorporates Short Needle damage. The Final Punch tank should either prepare invulnerable cooldowns or stack powerful cooldowns. Quickly top and shield players after Final Beam.
Gavel
Spoiler: show
-
2016-03-30 15:37 #8An exploitable mess of a card game
- Join Date
- Sep 2008
- Posts
- 13,258
- BG Level
- 9
- FFXIV Character
- Gouka Mekkyaku
- FFXIV Server
- Gilgamesh
- FFXI Server
- Diabolos
Phase 5: Final Flame
J Storm and J Wave
This phase is quite straightforward: Kill it before it kills you. Begin this phase with Sacred Soil and mitigation. The boss retains its hitbox positionals (It does not spin with him!). J Wave begins at roughly 6000 damage and increases by about 1000 damage every J wave. Plan to spend about 60s in this phase. Do not hesitate to use MP restore abilities from BRD or MCH. If you used the sac method for this encounter, you will likely only have LB2. Otherwise, you should gain an LB3. PLEASE BFB EARLY! Consider the following mitigation and healing buffs:
SCH
- Succor
- Deployment Tactics
- Sacred Soil
- Whispering Dawn + Rouse
- Fey Illumination
AST- Aspected Helios (Nocturnal Stance)
- Collective Unconscious
- Bole
- Disable
- Synastry
- Lightspeeds
WHM
- Asylums
- Divine Seals
Other
- Storm's Path
- Mantra
- Blood Bath
- Second Wind
- Tank CDs: May as well for the later ones right? IT COULD JUST BE YOU AND BRUTE JUSTICE.
- Holmgang: Lets you last about two more J Waves
- Divine Veil (Thanks for the reminder Ashildr Bloodfury!)
-
2016-03-30 19:44 #9An exploitable mess of a card game
- Join Date
- Sep 2008
- Posts
- 13,258
- BG Level
- 9
- FFXIV Character
- Gouka Mekkyaku
- FFXIV Server
- Gilgamesh
- FFXI Server
- Diabolos
Moved thread to public view.
-
2016-03-30 21:19 #10Campaign
- Join Date
- Sep 2007
- Posts
- 6,650
- BG Level
- 8
- FFXIV Character
- Sean Kipling
- FFXIV Server
- Midgardsormr
Edited because I am shit at reading and can't click links.
Amazing guide!
Edit 2: Is it possible to dodge all chakrams by standing on the intersections between tiles, or are they still wide enough to hit you regardless?
-
2016-03-31 00:25 #11An exploitable mess of a card game
- Join Date
- Sep 2008
- Posts
- 13,258
- BG Level
- 9
- FFXIV Character
- Gouka Mekkyaku
- FFXIV Server
- Gilgamesh
- FFXI Server
- Diabolos
Added tips from players (WHM and SCH so far).
@Kipling: Not possible, but there have been cases where it works if the chakrams are next to each other on DIFFERENT squares. It's not reliable though.
-
2016-03-31 01:47 #12Salvage Bans
- Join Date
- Apr 2006
- Posts
- 755
- BG Level
- 5
- FFXIV Character
- Rozaria Eleanor
- FFXIV Server
- Ragnarok
- FFXI Server
- Ragnarok

<3
really amazing work
-
2016-03-31 01:55 #13An exploitable mess of a card game
- Join Date
- Sep 2008
- Posts
- 13,258
- BG Level
- 9
- FFXIV Character
- Gouka Mekkyaku
- FFXIV Server
- Gilgamesh
- FFXI Server
- Diabolos
Thanks \( ' - '
-
2016-03-31 02:10 #14New Merits
- Join Date
- Mar 2014
- Posts
- 227
- BG Level
- 4

Fuck chakrams, easily the worst part of the fight.
Might be good idea, for intermission 2, to mention that mirage drop is physical damage, so shade shift, keen flurry, mana wall and so are really good to be used there, unless I somehow missed reading that.
-
2016-03-31 02:13 #15An exploitable mess of a card game
- Join Date
- Sep 2008
- Posts
- 13,258
- BG Level
- 9
- FFXIV Character
- Gouka Mekkyaku
- FFXIV Server
- Gilgamesh
- FFXI Server
- Diabolos
The damage type is mentioned in the glossary, but physical mitigation actions are not explicitly mentioned. I'll add that though.
-
2016-03-31 05:43 #16RIDE ARMOR
- Join Date
- Apr 2014
- Posts
- 21
- BG Level
- 1
- FFXIV Character
- Captain Condon
- FFXIV Server
- Coeurl
While I don't plan on doing this fight, I have to say this is an amazing write up or guide. Thanks for this!
-
2016-03-31 10:38 #17A. Body
- Join Date
- Jun 2007
- Posts
- 4,445
- BG Level
- 7
- FFXIV Character
- Sir Taint
- FFXIV Server
- Gilgamesh
- FFXI Server
- Cerberus
Awesome write up. Phase4 just sounds insane......................
-
2016-04-02 08:09 #18Hyperion Cross
- Join Date
- Jan 2007
- Posts
- 8,671
- BG Level
- 8
- FFXIV Character
- Kai Bond
- FFXIV Server
- Gilgamesh


When Brute JUstice grew wings, were you all already aware of that? (There was some JP site that posted it), or was it a first time reaction thing? Be interested to see/hear your team's reaction on that.
-
2016-04-02 08:11 #19BG Tech
- Join Date
- Feb 2006
- Posts
- 11,944
- BG Level
- 9
Pretty sure the model was already datamined before they even started progressing so they already knew an extra phase was coming...
-
2016-04-02 08:31 #20New Merits
- Join Date
- Mar 2014
- Posts
- 227
- BG Level
- 4
+ pushing to 0% around 8:30-9min mark pretty sure gives it away that there is more to come. Originally Posted by octopus

 Reply With Quote
 Final Judgement: Decree Nisi
 Final Judgement: Min & Max HP

Similar Threads
-
Alexander Midas (Savage): We Power Rangers now.
By Kipling in forum FFXIV: General Game Discussion and informationReplies: 364Last Post: 2016-07-19, 09:07 -
Alexander Savage DPS Leaderboard
By Ichthyos in forum FFXIV: General Game Discussion and informationReplies: 18Last Post: 2015-08-27, 23:54