 XI Wiki


So, like many of you out there, I've been a bit frustrated by the small number (16) of actions available per cross-hotbar palette, and have resolved to come up with my own solution. While what I have put together here does not completely replicate a normal cross-hotbar palette, it does allow for an extra 8 actions to be used from your gamepad by utilizing the triggers and L3/R3 buttons.
My solution consists of the following 3 elements:
- Xpadder (well worth the small asking price)
- Disable in-game button mappings
- In-game keybinds
First and foremost, I play with a PS3 controller connected via USB using Scarlett Crush's D3 drivers (Fuck that POS MotionInJoy), so the solution that I present here is based on my own experience and your mileage may vary with other gamepads. However, the basic concepts are the same, though the game may behave differently with the in-game gamepad mappings if you use a Direct Input controller.
Ok, on to the good stuff. The basic idea here is that you will use Xpadder to map the L2/R2 triggers (or L1/R1, depending on what you use to activate your cross-hotbar) to Ctrl/Alt, and the L3/R3 buttons to two keyboard keys that will activate actions in a normal hotbar. I prefer to use 1 and 2 for these purposes, but you can use whatever you'd like. Then, you set a hotbar to use the keystroke combinations that will be activated by the gamepad. Here's the complete tutorial:
Step 1 - Configure Xpadder
Since there's a billion tutorials out there on how to get Xpadder all up and running, I'm going to assume that you are already familiar with the basics of the program and will go right into the configuration part. What we're doing here is very basic, so don't fret.
First, configure a profile for your gamepad to utilize the L2/R2 triggers (or L1/R1 buttons, as referenced above) and the L3/R3 buttons. After setting up that controller profile, create a game profile and map the keys in the following manner:
L2 = Ctrl
R2 = Alt
L3 = 1
R3 = 2
Again, feel free to mix those up to your own likings and needs.
In the end, you should have a profile that looks something like this:
Once done so, you can minimize Xpadder, and remember that you'll need to have it running each time you log into FFXIV.
Step 2 - Deactivate in-game L3/R3 buttons
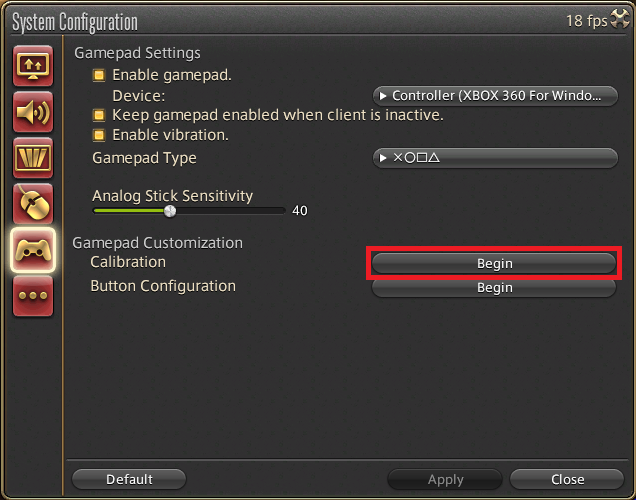
Since we have finished mapping the L3/R3 buttons to be keyboard keys 1/2, we now want to deactivate the normal in-game functions assigned to these 2 gamepad buttons. Basically, we want pressing them to use our mapped Xpadder keys instead of their normal ingame functions. Unfortunately, the game won't let you do exactly that if you've already calibrated those buttons with your gamepad, so the next best thing is to go through the calibration process again and skip the L3/R3 buttons. Do so by going to System -> System Configuration -> Gamepad Settings -> Calibration:
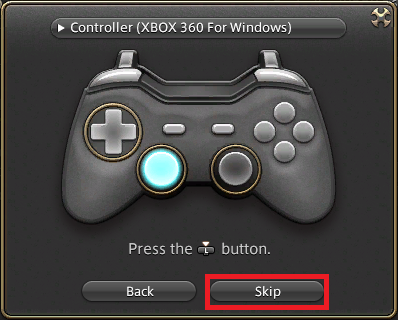
Run through the calibration process until you get the part where it asks you to press the L3 button. When it does, simply press Skip. Do the same for the R3 button as well:
When finished, click Save and then Apply.
Step 3 - Assigning custom keybinds to a hotbar
The last step in the process is to set a hotbar (or two or three, whatever you prefer) to use our newly mapped Xpadder keys. Go to System -> Keybind. Start by selecting which hotbar you want to use, and assign the following commands to any 8 Hotbar slots. I used the first 8 slots in hotbar 1:
- 1
- 2
- Ctrl+1
- Ctrl+2
- Alt+1
- Alt+2
- Ctrl+Alt+1
- Ctrl+Alt+2
Once that's all set, go ahead and map some actions to the newly configured hotbar. Here's an example of mine:
In this setup, pressing the L3 button will activate the first hotbar slot and call out my Choco. Likewise, pressing R3 will activate the second hotbar slot and use Sprint. Different combinations of L2/R2 (Ctrl/Alt) + L3/R3 (1/2) can be used to activate the actions on the other 6 slots, very similar to how you would use a normal cross-hotbar. The obvious difference here is that you're using the R3/L3 buttons instead of the normal d-pad and face buttons.
Hope some of you find this helpful!
- Navigation
Results 1 to 17 of 17
-
2013-09-12 19:27 #1And they're spectacular!

- Join Date
- Feb 2007
- Posts
- 609
- BG Level
- 5
- FFXIV Character
- Mitzy Mystfire
- FFXIV Server
- Gilgamesh
- FFXI Server
- Titan

Creating Extra Pseudo-Cross Hotbar Actions
-
2013-09-12 22:16 #2CoP Dynamis
- Join Date
- Dec 2009
- Posts
- 262
- BG Level
- 4

What an elegant solution! The way I'll probably do it is to disable the Start and Select buttons instead (don't like using L3 and R3, I sometimes press them by mistake) since I almost never use them. That still gives me 6 extra slots, bringing it up to 22 - which, with judicious use of macros, should be enough for any situation. (I hope!)
I sure hope SE finds a way to make things easier for controller users in the future without having to resort to workarounds like this. 16 slots is kind of restrictive with the current setup, and currently switching hotbars isn't as smooth as I'd like it to be. I ended up having to make a macro to do that, which uses up 2 slots (one to switch, one to switch back)
The only thing I'm worried about is whether or not SE considers Xpadder a harmful 3rd party program. As it's completely client-side (and doesn't even interface with FF14 at all) it shouldn't matter, but they can get awful pernickety about some things.
-
2013-09-13 05:13 #3RIDE ARMOR
- Join Date
- Sep 2008
- Posts
- 17
- BG Level
- 1
- FFXIV Character
- Lorelai Amalia
- FFXIV Server
- Phoenix

This is pretty cool! Two things have made my experience using a controller, like, 24% better: Firstly, utilising the '/chotbar change <palette number>' command to be able to switch to my sub palette quickly, and then back to my primary palette automatically after having executed an action. For example~♪
/micon "Second Wind"
/action "Second Wind" <me>
/chotbar change 1
Secondly, I bought the official XIV gamepad - whoa now, what? - and it comes with a handy little function button, which you can hold down to turn all twelve buttons on the gamepad into F keys briefly. Assign a hotbar to use utilise those keys, and reassign the original F key functions to Ctrl+1 etc. et voila, you've a good *counts* 44! abilities less then a button press or two away. *salutewink*
-
2013-09-13 09:44 #4Hyperion Cross
- Join Date
- Jan 2007
- Posts
- 8,904
- BG Level
- 8
- FFXIV Character
- Kai Bond
- FFXIV Server
- Gilgamesh

Inferior PS3 user here. I have a slightly different solution with the gamepad, although I'm not that far yet to determine if it's a good method.
Essentially, I lock down 2 action bars only in combat (so my R button would only ever rotate between 2 sets) (this might extend to 3). My R trigger's 8 keys will contain all the same actions I'll regularly use to do my job. My L trigger which will contain stuff that needs cooldown (Rampart, Convooeladoadlaence, Fight or Flight etc). Maybe not that efficient, but that's how I planned on setting it up. That way I can quickly cycle through and retain my core rotation, but at the same time just check out other bars.
Additionally, if it's possible on PS3, I might enable the other bars (the PC styled ones?) and minimize it for my "crucial" cooldowns so I know when to switch to them when they're up. Will slide them in a corner of the screen or something.
-
2013-09-13 10:01 #5E. Body
- Join Date
- Dec 2006
- Posts
- 2,332
- BG Level
- 7
I was under the impression PS3 users did not have access to those other bars. Which sucks horribly lol. I hope they can implement them in the PS4 version.
-
2013-09-13 10:13 #6Hyperion Cross
- Join Date
- Jan 2007
- Posts
- 8,904
- BG Level
- 8
- FFXIV Character
- Kai Bond
- FFXIV Server
- Gilgamesh
Ah. I play on the PC also, I was fiddling on it the last 2 days on PC. But yeh I don't remember seeing the option on PS3. That'll suck.
But still, think of it was PC = serious play where I need to watch my cooldown timers, the extra bars will serve the purpose while still retaining the ability to play on a controller
-
2013-09-13 22:52 #7And they're spectacular!
- Join Date
- Feb 2007
- Posts
- 609
- BG Level
- 5
- FFXIV Character
- Mitzy Mystfire
- FFXIV Server
- Gilgamesh
- FFXI Server
- Titan
I had originally come up with the idea because I wanted a single button press for a couple of my most commonly used actions (Sprint and a Mount), regardless of which job/class I am currently on. Having L3 and R3 as buttons for those functions is very nice, and saves me from having to add them to a normal cross-hotbar. I still need to play around with some macros and see what else I can do with this config.
-
2013-09-14 07:22 #8Hyperion Cross
- Join Date
- Jan 2007
- Posts
- 8,904
- BG Level
- 8
- FFXIV Character
- Kai Bond
- FFXIV Server
- Gilgamesh
I get why you want that, but re-reading your opening post I was beginning to wonder if you tried to play with the shared and sheathe/unsheathe weapon bar settings. It almost seems like you want every button available at once? Below is just a suggestion. Sorry if you did consider it already but didn't like it:
My setup is as follows:
[Locked] Bar 1 - sprint, mount, pets, for all classes [unsheathed weapon only]
Bar 2 \
Bar 3 - Sheathe only, not shared, contains my actions for job. Also locked until I unsheathe weapon which will auto switch it to Bar 1
Bar 4 /
-
2013-09-14 18:01 #9The Shitlord
- Join Date
- Feb 2008
- Posts
- 11,560
- BG Level
- 9
- FFXIV Character
- Kharo Hadakkus
- FFXIV Server
- Hyperion
- FFXI Server
- Sylph
- WoW Realm
- Rivendare
This is pretty much how I play. It takes a while to really get a grasp of how this and the target filter systems work, but once you do, the controller is actually just as fluid as keyboard. Especially if you streamline your stuff. Same types of actions in the same spots, etc. For now, I have all but tabs 1 2 and 3 set to share, since empty tabs don't show up when you page through with a right bumper tap (hold to jump to a specific one). Will add more if I ever need that many abilities in combat. Then for Set Customization, I have 1, 7, and 8. Eight is my gear sets (will probably need another tab when I start leveling more crafts/jobs). Seven is my mounts, teleports, and common non-combat spells like Protect and Raise and Ghysal Greens (even though I haven't unlocked that as an ability yet). 1 2 3 and 4 are the only ones set for Weapon Drawn. The first three are not Shared (making them class/job specific) but the fourth is, which makes it a generalized combat tab. On 4 I have Limit Break, potions and medicines, Ghysal Greens, and my common non-combat spells like Protect and Raise. Sprint is ALWAYS Right Trigger + A, because you never know when you'll have to flake out. Originally Posted by The Stig

At any given time, all of these tabs are accessible by holding down the bumper, but with my weapon sheathed only 1, 7, and 8 (for now) will appear when paging through with a tap. With my weapon drawn, that changes to 1-4 (but 3 is blank so it doesnt show up yet). Also, the targeting filters work the same way, so as soon as I've used an action my weapon comes out and my filter changes to Enemies, making it easier to target multiple hostiles. If I ever care enough to target other players, I can access the Friendly filter by holding left bumper + ABXY.
So yeah. At first, the controller seems clumsy, but I've gotta say, they put a lot of thought into it, so if you play with the settings enough you can make it as smooth as any other control scheme.
-
2013-09-14 18:20 #10So hard we fuck rocks
- Join Date
- Jan 2009
- Posts
- 3,043
- BG Level
- 7
- FFXI Server
- Sylph
Can a keyboard/mouse be used on the PS3?
-
2013-09-14 18:25 #11Bard-turned-Miner
- Join Date
- Aug 2005
- Posts
- 2,645
- BG Level
- 7
No, that interface is not built in because of memory limitations. Originally Posted by shepardG
-
2013-09-14 18:34 #12So hard we fuck rocks
- Join Date
- Jan 2009
- Posts
- 3,043
- BG Level
- 7
- FFXI Server
- Sylph
Wack
-
2013-09-14 19:31 #13Bard-turned-Miner
- Join Date
- Aug 2005
- Posts
- 2,645
- BG Level
- 7
Anyone happen to know if this program (or any program) can intercept the "home" button on the xbox controller and make it usable for something else?
-
2013-09-14 21:45 #14And they're spectacular!
- Join Date
- Feb 2007
- Posts
- 609
- BG Level
- 5
- FFXIV Character
- Mitzy Mystfire
- FFXIV Server
- Gilgamesh
- FFXI Server
- Titan
Yup, that's exactly what I tried at first. So far, I really haven't found any practical use for myself by manually sheathing/unsheathing my weapon, hence why I ended up disabling the L3/R3 buttons entirely, freeing them up for other purposes. Before I thought to do that, I was performing two actions simultaneously with each press of L3/R3 - both the default mappings of Target Lock/Sit and my Xpadder mapped keyboard button 1. I absolutely adore having my mount and sprint set to a single button press function though, and wouldn't change that for anything. Originally Posted by The Stig
One interesting thing that I found out is that you can manually edit the FFXIV.config file and assign your own ingame button actions to any button that you desire. Want to Jump with a press of the Start button? You can't do that via the ingame UI, but you can by editing the config file. There's some quirks to it though, namely that you can't unmap a button entirely (have to Skip the button in Calibration to do so), and while you can assign the same action to more than one button, the game will recognize only one of the buttons. For instance, if Jump were set to both Triangle and Select, then only one of them would actually result in Jump, and the other button would not function at all.
-
2013-09-26 10:42 #15Smells like Onions
- Join Date
- Sep 2013
- Posts
- 2
- BG Level
- 0
I feel dumb asking this but here goes, so to activate couerl and sprint I got it press L3 or R3. But what do you press to activate the rest of the hot bar? How do you activate that red ball thing? I've never done a hotbar before.
-
2013-09-26 10:57 #16And they're spectacular!
- Join Date
- Feb 2007
- Posts
- 609
- BG Level
- 5
- FFXIV Character
- Mitzy Mystfire
- FFXIV Server
- Gilgamesh
- FFXI Server
- Titan
In my example, I have mapped my L2 button to be Ctrl on my keyboard, and L3 is the number 1 on the keyboard. I have also activated a normal hotbar and set slot #3 to activate on Ctrl+1. That means that pushing L2+L3 (which results in Ctrl+1 due to the Xpadder assignments to those buttons) will activate hotbar slot #3 and call out my Wind-up Dalamud minion (the "red ball thing").
-
2013-09-26 12:32 #17Smells like Onions
- Join Date
- Sep 2013
- Posts
- 2
- BG Level
- 0
I will try when I get home. I keep hitting the wrong bar but that's user error ;p I dont like having to switch to another set to run and I mistakenly end up using an item ; ;





Similar Threads
-
Cross Hotbar / Hotbar Order Suggestion
By Kurokikaze in forum FFXIV: General Game Discussion and informationReplies: 28Last Post: 2013-09-09, 17:15